Making Communication Visible: Using Visual Supports in Daily Routines
Visual supports are not just for classrooms or therapy sessions. They are tools that make communication clear, predictable, and calm for children. Many parents think of visuals only as picture schedules, but visuals can support almost every part of your child’s day—from playtime to mealtime to helping with big emotions.
Whether your child has speech or language delays, autism, attention challenges, or simply benefits from extra structure, visuals can help everyone understand what is expected, what is next, and what choices are available.
This article will explain what visuals are, why they work, and how to use them throughout the day, not just for schedules, but for routines, transitions, and behavior support.
What are visual supports?
Visual supports are anything your child can see that helps them understand, communicate, or stay organized.
They might be:
- Pictures or symbols (photos, drawings, Boardmaker or PECs-style images)
- Objects (actual items like a cup to show snack time is next)
- Written words (for readers)
- Gestures, signs, or body language
- Visual boundaries (a mat showing “play space” or a labeled bin)
- Timers or countdowns (sand timers, visual apps, or kitchen timers)
The type of visual you choose depends on your child’s age and communication level. The goal is always the same: to make life more understandable and predictable.
Why visuals work
- They reduce verbal overload. Children hear many words each day. Visuals simplify language and show what words mean.
- They stay longer than speech. Spoken words disappear, but pictures and objects remain. Your child can look again and again.
- They lower frustration. When children know what to expect or how to communicate needs, there are fewer meltdowns.
- They build independence. Visuals give children the tools to follow routines and make choices without constant reminders.
- They help both understanding and expression. Visuals can support comprehension (“first clean up, then snack”) and expression (“I need help”).
Step 1: Start where your child is
- For toddlers or early communicators: Use real photos or simple drawings of familiar things—snack, shoes, mom, ball.
- For preschoolers: Use picture symbols or simple clip art. Include some emotion faces, activity icons, and home routines.
- For older children: Use written words, checklists, or short “first-then” cards.
Keep visuals consistent. Use the same pictures and words across environments when possible.
Step 2: Use visuals beyond the schedule
Visual supports do not end after you show “first school, then home.” They can guide every part of the day.
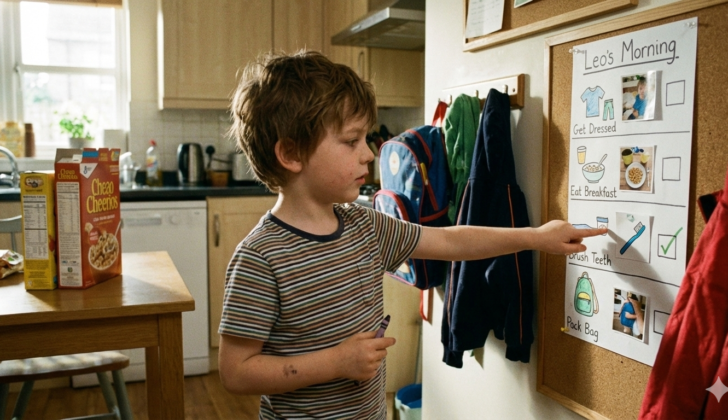
1. Daily routines
Example: Getting ready in the morning.
- Show or post a short sequence:
🦷 brush teeth → 👕 get dressed → 🍽 breakfast → 🎒 backpack. - As each step is finished, your child removes or turns over the picture.
- Script: “All done brush teeth. Next is shirt.”
Tip: For independence, place visuals at eye level near where the task happens (bathroom mirror, dresser, door).
2. Play
Visuals in play can:
- Show choices (“cars,” “blocks,” “farm”)
- Guide turn taking (“my turn / your turn”)
- Model pretend ideas (“feed the baby,” “drive to the store,” “fix the car”)
Example: During pretend kitchen play, keep simple food pictures nearby. If your child gets stuck, you can point and say, “Let’s make soup,” or “Add carrots!”
Visuals help children expand imagination and language without you doing all the talking.
3. Transitions
Transitions like leaving the park or moving from screen time to dinner are often stressful. Visuals make the change more concrete.
Tools to try:
- Visual countdown (“5 more minutes,” “2 more minutes,” “all done”)
- First/Then board (“First bath, then book”)
- Timer or visual clock
- Photo of next location (picture of bathtub or dinner table)
Example Script:
“First swing, then car.” (show both pictures and point as you speak)
When time is almost up: “One more swing. Then car.”
Children process visual reminders better than long verbal explanations in these moments.
4. Emotional regulation and undesired behaviors
Visuals can also teach coping strategies and support emotional understanding.
Examples:
- Feeling chart: Child points to “happy,” “sad,” “mad,” or “tired.”
- Calm-down choice board: “Hug,” “breathe,” “soft toy,” “quiet space.”
- Stop/Go cards: Red means stop and take a breath; green means ready to go back to play.
- Expected/unexpected chart: Pictures that show what behaviors are okay and which ones are not, matched with visuals of what to do instead.
Example Script:
“You feel mad.” (point to “mad” face)
“When mad, you can choose.” (point to calm-down options)
“Take deep breaths or squeeze your toy.”
This turns a behavior moment into a teaching opportunity rather than a power struggle.
5. Communication
Visuals give children a voice when words are hard.
Try:
- A choice board (“snack,” “water,” “help,” “all done”)
- A request card they can hand to you
- A portable ring of favorite words or activities
You can pair visuals with spoken words so your child begins to connect both systems:
Adult: (points to picture) “Drink. You want drink.”
Over time, many children begin to say or attempt the word as they point.
Step 3: Keep it consistent but flexible
- Use visuals daily, not only when things go wrong.
- Start with one area (morning routine, mealtime) and expand gradually.
- Model how to use them. Do not expect your child to automatically understand.
- Involve your child—let them help place pictures or choose which ones go first.
- Fade visuals slowly as independence grows, but keep them available when needed.
Step 4: Make visuals part of your language
Pair every visual with words and natural tone.
Example:
- “First brush teeth, then story.” (show both pictures)
- “All done park. Time for car.” (move park card, show car card)
- “You feel sad. Let’s pick calm choice.” (point to calm visuals)
Children learn best when they both see and hear the message.
Common myths about visuals
“My child will become dependent on pictures.”
Actually, the opposite happens. Visuals reduce frustration, improve understanding, and often lead to more verbal communication, not less.
“Visuals are only for children with special needs.”
All children benefit from predictability and clear expectations, just like adults use calendars, lists, and maps.
“I need fancy materials.”
You can start with photos on your phone, printed clip art, or hand-drawn stick figures. The key is consistency, not perfection.
Example visual ideas by setting
| Situation | Helpful Visual | Example Language |
| Morning routine | Picture sequence | “All done pajamas. Next, brush teeth.” |
| Snack time | Choice board | “You want apple or crackers?” |
| Play | Toy labels, turn cards | “My turn, your turn.” |
| Transition | First/Then, countdown timer | “First clean up, then outside.” |
| Emotion | Feeling chart, calm choices | “You feel mad. Let’s choose squeeze ball.” |
| Bedtime | Visual bedtime steps | “Story, hug, lights out.” |
Step 5: Celebrate progress
Notice and praise how visuals help your child succeed:
- “You looked at your schedule and got dressed all by yourself.”
- “You used your ‘help’ picture. That was great talking.”
- “You checked the timer and came right to the table.”
This builds ownership and confidence, turning visuals into part of everyday life.
Final thoughts
Visuals are a bridge between words and understanding, between frustration and calm, between adult expectations and a child’s sense of control.
When used beyond schedules, they help children navigate routines, manage feelings, and communicate with greater independence.
Start small, stay consistent, and remember: every picture, symbol, and visual cue is another way of saying, “I want to help you understand the world.”
Keep Learning & Stay Connected
Follow First Words Bright Futures on Facebook and Instagram for:
-
Daily speech tips
-
Fun activity ideas
-
Q&A with a pediatric SLP
Explore More:
- MDS: How to Use Narration to Boost Your Child’s Language
- MDS: How to Help Your Child Learn to Ask Questions | Parent’s Guide
Disclaimer: This article offers general educational information. It is not a substitute for professional evaluation or treatment. Please consult a licensed Speech-Language Pathologist for personalized concerns regarding your child’s speech development.